7 core trailer wire is used on large recreational and residential vehicles - it is the most advanced connector available that can supply the full range of trailer functionality including taillights, brake lights, turn lights, trailer breaks, reverse lights, auxiliary power, and a ground connection. The 7 core trailer wire provides additional connectivity compared to its smaller sister connectors: The 6 core, 5 core, and 4 core.
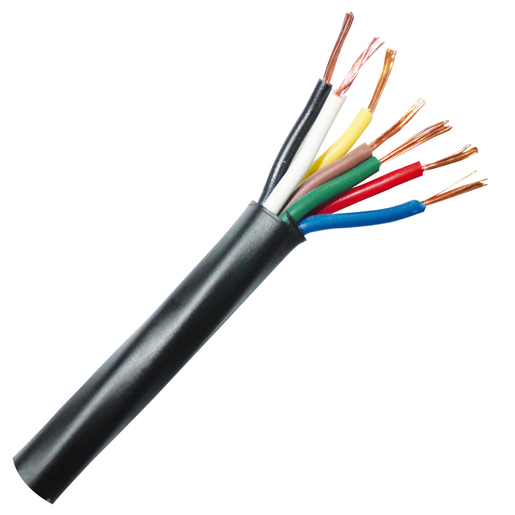 7 core trailer wire is the only trailer wire type to have 2 sub-groups: 'Blade' and 'Round'. These two variations appear similar, however, you should identify which one your trailer uses before you purchase a new 7 core trailer wire. The most common style is the 'blade' style and it can be found on all the newest trailers. The latter is a round style that has smaller round pins.
List Of Vehicles That Use 7 Core Cables:
· Boats.
· Utility trailers.
· Car trailers.
· Equipment trailers.
· Horse trailers.
· Dump trailers.
· Live-in/travel trailers.
· Construction trailers.
· Transport trailers.
· Other large vehicles.
The 7 core trailer wire is one of the newest-generation wires that became the go-to wire on all new heavy-duty vehicles. This wire has a lot in common with smaller wires such as 4 pin trailer wires due to the fact it provides the same core functionality but with additional features.
If you use an older trailer that uses electric breaks and a 6 pin connector, you can replace it with a 7 pin connector for additional functionality. Most 7-way trailer plugs have a large 2" diameter connector that provides extra pins for 12V power and backup lights. This connector is becoming widespread on all heavy-duty vehicles. While it started being used on trailers, it is now commonly found on boats as well.
 The functionality of the 7 pin connector far exceeds that of smaller connectors because it provides the fundamental lighting functionality needed including advanced brake systems. Smaller 4 pin connectors can only power the lights, but the 7 pin connector's additional pins leave room for auxiliary power, backup lights, breaks, and more.
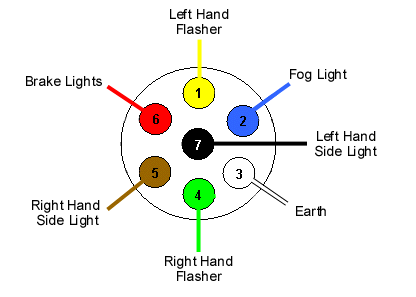
Only 6 pin connectors come close to the functionality of a 7 pin connector, but they are not as widespread. If you're wondering what the 7 core trailer wire stands for, here's a breakdown of the functionality based on the color:
· 1. WHITE WIRE: The grounding wire.
· 2. BROWN WIRE: Power to the taillights and license plate.
· 3. YELLOW WIRE: For left and right turn signals.
· 4. GREEN WIRE: For right turn and stop signals.
· 5. BLUE WIRE: For the brake system (electric breaks or the hydraulic reverse disable).
· 6. RED WIRE (sometimes it's black on 7 pin wires): 12V auxiliary power.
· 7. PURPLE WIRE: Back up lights.
Note: Not all 7 connectors have to be hooked up to the trailer in order for the functionality to work. For instance, you could use this wire on a smaller trailer where you only need the first 4 wires - similar to a 4 pin connector. If you leave certain pins unused or unconnected, this won’t affect the performance of the trailer.
Let's say you decide to install the lights but you don't have any use for auxiliary power or brake systems - you can simply leave those out. If there's a blank spot, it won't affect the wiring harness. However, if you have a fully-functional large vehicle you will likely have to connect all 7 pins.
Installing a 7 core wire is a straight-forward process if you prepare in advance. To avoid accidents, start by being careful with the way you handle the cable. Many people get in an accident when they forget to unplug old cables or pull their cables too harshly.
Cables take constant abuse, and you eventually have to replace them. If you ever looked at an average 7 pin connector, chances are you were left confused as to what each pin represents. The manufacturer of the cable will provide a diagram showing you how to match the 7 pins to the vehicle's harness.
· Pro Tip: You have to know what each color represents and match it to the exact function. For instance, the white wire (typically the ground wire) has to be attached safely to the frame of the vehicle and the side.
The first step to preparing yourself for the installation of the 7 core pin is to align the cables in the way the manufacturer's diagram shows them. Make sure to point them in the right direction because if they're backwards this can cause problems. Installing 7 core cables is not only about matching colors because many times the colors of the pin won't match the vehicle's colors - it's about matching the functions!
Step 1) Loosen the screws on the side in order to take the end of the 7 way connector off. There's going to be a white sleeve that holds it in place. Start cutting the sheathing off - this will expose the 7 core wires with their different colors. Each wire will have a plastic coating. To prepare each wire, you'll have to strip the end of that plastic coating.
Step 2) Check whether the colors of the wires match the colors of the pin posts in the vehicle. To start the installation, you'll have to ground the wires and then test the individual functionality of each wire.
Step 3) Begin the installation with a ground wire which is usually the white wire in the connector. Take the white wire and match it to the vehicle's white pin post. To do this, simply unscrew the screw and insert the white wire in the pin post, then tighten the screw. You're now ready to move on to the other colors.
Step 4) Connect other wires. The second wire is usually the blue wire which serves as the trailer brake wire. The pin post may be a different color though, so double-check to make sure. Continue the installation by connecting the brown wire (right turn signal) with the brown or green post, depending on the trailer. The black wire should go in the black post which serves as the 12V hot wire. The green wire (sometimes brown) should go in the green post and it's used for parking lights. The red/yellow wire should go in the yellow post and it's used for auxiliary power and reverse lights.
Step 5) Once you've installed all 7 connectors, push the top back into the cover and then screw it back together. You're now ready to plug your trailer back in and begin the testing!

